How to reset server root password from Rescue System! [Hetzner]
It has been a long time since I’ve written an article. Recently I was working with a client, and the client lost his root password. The server was hosted with Hetzner. In this article, we are going to see that how we can reset the root password if it is somehow lost. You need to have access to Hetzner robot to reset server root password from the rescue system.
What is a rescue system?
Let see what is a rescue system, because sometimes people don’t really know what actually rescue system is and why it is used. Rescue system is basically a temporary Linux operating system which runs on the server itself (Inside server ram). It is most used when you have some trouble in your main operating system and something is not working, the good example is losing a root password.
Or if your filesystem on the main operating system does not work. There can be various possible reasons that you might need to boot into the rescue system of your server. In this article, we will see that how we can use rescue system to reset root password of the server, there are various possible configurations of your hard disk that you might have used and each may require a different procedure to reset the root password:-
- OS is installed with Raid.
- OS is installed on LVM.
- OS is installed on simple disk partitions.
We will see for different disk configurations that how we can reset the password.
Step 1: Activate the Rescue System!
The first step is to log into your Hetzner robot, after logging into Robot you will see something like this:
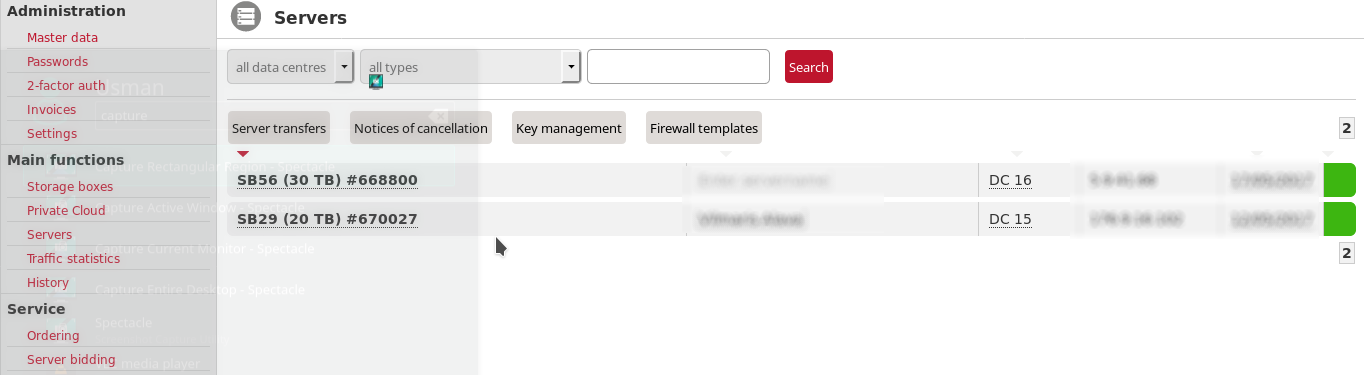
On the left side, you will see the menu, you need to click on “Servers”, and you will see the list of servers on the right side. Just like you see in the image above. Currently, I’ve 2 servers in the list, I need to choose one of them to activate the rescue system. Once the server is selected you will have to follow the steps mentioned below:
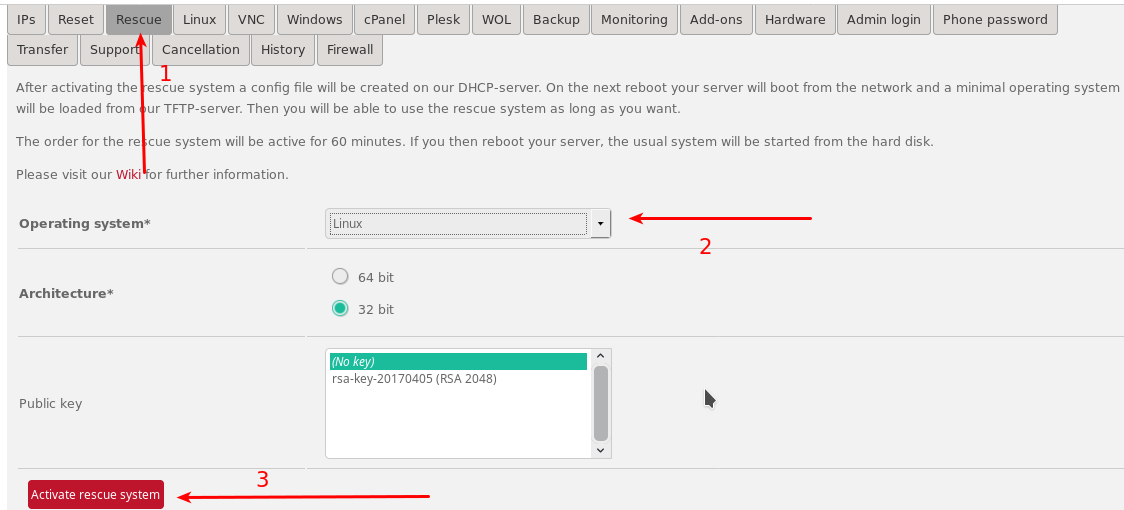
- First, click “Rescue” from the menu.
- Second, you have to choose the operating system to be installed as a rescue, leave the defaults.
- Finally, click “Activate rescue system”.
After you click “Activate rescue system”, it will provide you with the password that you can use to log into the rescue system. However, you first need to reset the server before the rescue system is installed.
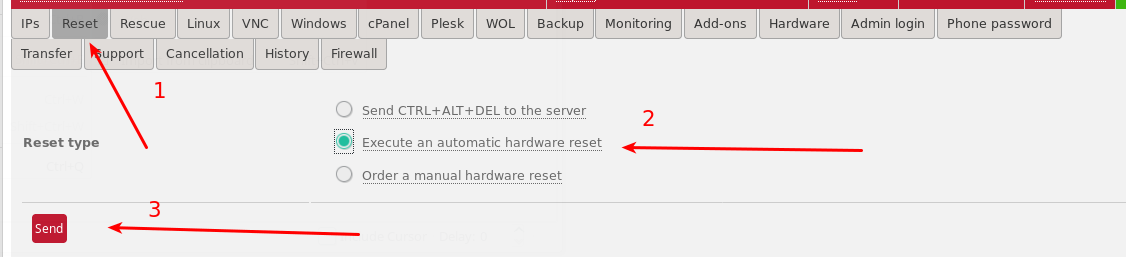
Resetting the server is very simple, just click the headings by following the sequence in the above screenshot and your server is ready to be used. Once the reset is successfully you can log in to rescue system and start resetting your password.
Step 2: Mount the hard drives of your server!
The second step of this process is to mount your hard drives because you need to access your installed operating system to reset the root password. As I’ve discussed above there can be many ways your server might be configured, let see how we can mount the root file system of the server to reset root password in each configuration.
Server Disks with no Raid
If your server has 1 or multiple disks but no Raid or LVM, it is possible that OS can be installed on either of them. You can list your disks using the following command:
ls /dev/[hsv]d[a-z]*[0-9]*
It will print out detected disks or partitions in the following format:
/dev/sda /dev/sda1 /dev/sda2
Now your OS can be installed on any one of them, you can create two temporary folders to mount these drives.
mkdir part1
mkdir part2
This will create two empty directories where you can mount the detected disks.
mount /dev/sda1 part1
mount /dev/sda2 part2
Commands above will mount the detected partitions on the directories we created above. Now you can see these folders to check which one have your operating system installed. Once you are certain that your OS is installed on /dev/sda2 you can start resetting your password. But before resetting the root password, let see how we can mount drives with other disk configurations.
Server Disks with Raid
If your server has disks with Raid, then mounting the drives is bit different. So be careful about your disk configurations before you start mounting them. You can list your MD devices using:
ls /dev/md*
This will list all your MD devices, now the procedure is similar you can mount all of them and see which one have your operating system installed. It will list your MD devices as follows:
/dev/md0 /dev/md1
Now your operating system can be installed in any one of them, use the commands below to mount these devices:
# create mount points

mkdir device1
mkdir device2


# mount the devices on mount point

mount /dev/md0 device1
mount /dev/md1 device2
It is possible that you may have more devices, you can create as many mount points and mount these devices and then check which folder have your operating system installed.
Server Disks with LVM
Now if your server doesn’t have any configurations mentioned above, it is possible that you have LVM configured, you can use the following command to list your logical volumes:
ls /dev/mapper/*
Now it will print out the logical volumes of your server and your OS can be installed in any one of them, one example of printed logical volumes can be:
e.g. /dev/mapper/vg0-home /dev/mapper/vg0-root
Now they can be mounted as follows:
mkdir lvm1
mkdir lvm2

mount /dev/mapper/vg0-home lvm1
mount /dev/mapper/vg0-root lvm2
Well, in this case, the logical volume with “root” in its name gives you a hint that OS is installed on this logical volume, however, you can still mount all logical volumes and manually check.
Step 3: Reset the password
Until now we’ve only prepared to reset the root password, in Step 2 we saw that how we can mount our server disks so that we can reset our root password. Without mounting the server’s disks we can not reset the root password, so please carefully read the step 2.
Note: Please note that on step 3, I’ve mentioned 3 ways to mount the server disks, however only one would apply to your server depending upon how its disks were configured when the operating system was installed.
Once the disks are mounted and you are sure about which disk your OS is installed, you can easily reset the root password. We will assume that your operating system disk is mounted at “osmountpoint” folder in your current working directory. Keeping in mind this information we can use commands below to reset the root password:
# use chroot to switch into the mounted system to reset password

chroot-prepare osmountpoint

chroot osmountpoint


# now we can easily reset password using normal linux passwd command

passwd

# run passwd on the terminal and than you can reset password for the root user
See how simple it was to reset the root password once the disks are mounted, only tricky part was to detect your disk configurations and mount the disks. After that resetting, the root password was a piece of cake, finally reset your server again using hetzner reboot to boot into your original operating system.
If you have any questions feel free to post them in the comment box below.
Hi,
always in hetzner,
how I can found and reset the iptables for a wrong ssh configuration that don’t permit to ssh re-login ?
thx
Do you want to disable ssh logins ?
Big hole in these instructions is this line:
“We will assume that your operating system disk is mounted at “osmountpoint” folder in your current working directory. ”
It’s not clear how to translate the disk mounts such as device1 and device2 to your “osmountpoint” example, please carry through consistent examples all the way through. Further for mirrored raid drives, where one has device1 and device2, how do you then reset the password in that situation.