
How to backup and transfer a Proxmox VM to another Proxmox Node
Moving proxmox virtual machines between different servers became very easy with recent proxmox updates. You can use proxmox web GUI or command line interface to create a proxmox virtual machine backup and than move to a remove server. In this article we will see how to backup and transfer a proxmox vm to another proxmox node, both using GUI and command line.
Step 1: Enable your disk to store backups
Normally your hardisk is enabled to be used for:
- Disk Image
- Iso Image
- Container Template
- Container
That means currently you can not store your virtual machine backup on your hardisk, so you need to make sure that your hard disk can store VZDump Backup File (file that is created after we initiate a virtual machine backup). Please follow the instruction in the image below:
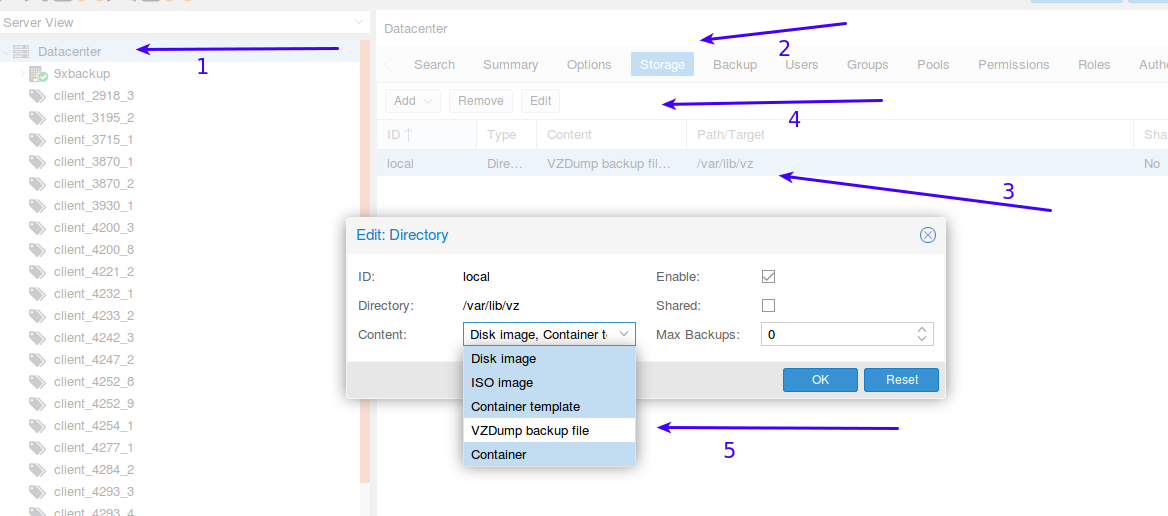
- Click on Data Center
- Click on storage to list your server storage mediums.
- From list select the storage medium on which you need to store backups, we have only one so we selected it from the list.
- Once selected than click on Edit.
- You will than see that pop-up box that is currently displaced on the screen, from ‘Content’ drop down you can see that all other selections are highlighted blue, make sure VZDump Backup file is also highlighted in blue and click OK to save your changes.
Now your storage medium is ready to store backups.
Step 2: Create Backup
Their are two ways you can create backups, from GUI and command line as well, we will first discuss the command line version because its very easy.
Create backup from command line
Login to your server ssh and run the following command:
# Change directory where backups are stored

cd /var/lib/vz/dump

# create backup

vzdump 100

# this will create backup for vm id 100
It will than take some time for backup to complete, and progress will be displayed on the terminal. It will look something like this.

Create backup from Proxmox GUI

- Select your virtual machine from left side bar.
- Click on Backup.
- Click on Backup now
- From compression drop down menu select none, if you select the compression it will put the compression over head to the cpu, but backup size will be small.
- Finally click Backup.
After that your backup will be in /var/lib/vz/dump folder of the server.
Step 3: Move backup file via scp
Once the backup is completed you can simply scp it to the remote server, please note that your backup file will be named something like this “vzdump-qemu-122-2016_09_13-14_12_32.vma”.
To scp this file to the remote server use the command:
# change directory

cd /var/lib/vz/dump

scp vzdump-qemu-122-2016_09_13-14_12_32.vma [email protected]:/var/lib/vz/dump/vzdump-qemu-122-2016_09_13-14_12_32.vma

# this is one single command
In the command above please replace “vzdump-qemu-122-2016_09_13-14_12_32.vma” -> with your actual backup file name. It will take some time depending upon server network speed at both ends.
Step 4: Restore the backup
Final step is to restore the backup, you can restore backup via command line or GUI.
Restore backup from command line
Restoring backup files are pretty easy through command line:
cd /var/lib/vz/dump

qmrestore vzdump-qemu-122-2016_09_13-14_12_32.vma 500
qmrestore is the command to restore VM, next is the virtual machine name “vzdump-qemu-122-2016_09_13-14_12_32.vma” and the last argument is the VM id (500), you can choose any VM ID that is not being used earlier.
Restore backup from Proxmox GUI
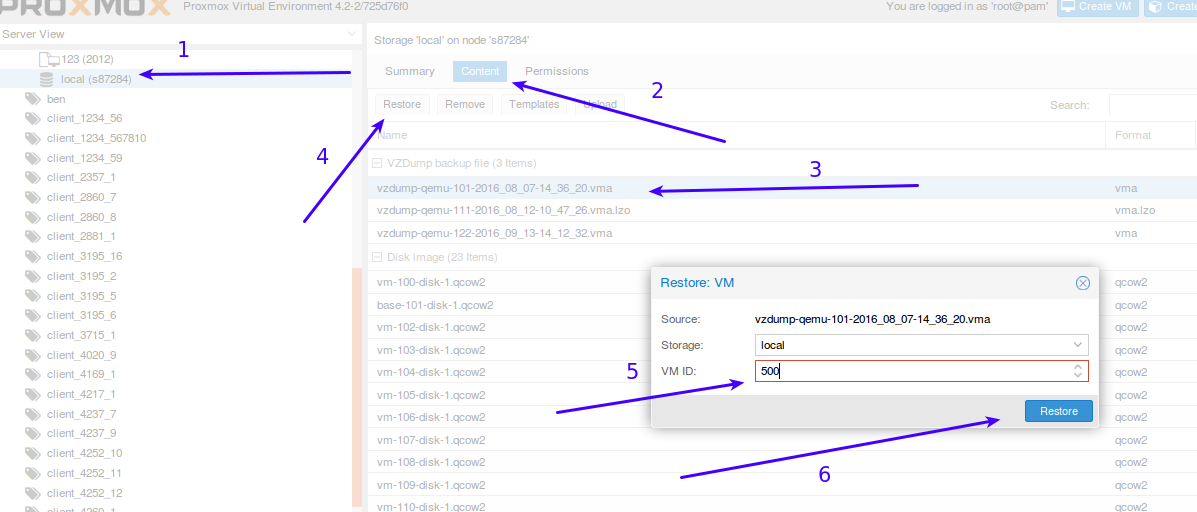
- Select local storage (normally here the transferred backup will be stored)
- Select “Content”.
- You will see the list of backups, select the one you just transferred.
- Once the backup is selected click Restore.
- Input the VM ID:500, or any other ID you want to give to the restored VM.
- Finally click Restore.
It will take some time and your VM will be restored to the VM ID you gave at step 5. That’s all to transfer virtual machine from one promox node to another, you can choose either the GUI or command line version but command line version have less head ache.
[…] How to backup and transfer a Proxmox VM to another Proxmox Node […]
This helped me a bunch.
Thank you!
[…] 7. How to backup and transfer a Proxmox VM to another … […]
[…] 7. How to backup and transfer a Proxmox VM to another … […]
my vzdump file is a tar file
vzdump-lxc-100-2021_09_13-02_55_13.tar
do I still use this filename to restore?
Sorry still new to Proxmox
My vzdump has an extension tar file
will that still work?? when I restore
thank’s
Thank you very much!
This saved me a lot of time.
Thanks alot. Moved some vms from a provider to my home.
Hello Sorbon! Did you find solution?