Packet sniffing using Snort
I’ve explained in my last tutorial that how you can install snort on Ubuntu, if you have not installed it yet you can click here. In my article where I explained how to install snort, I mentioned that snort have two running modes, today we will see how we can do packet sniffing using snort.
What is packet sniffing?
In packet sniffing all you do is look at all the packets passing through your interface, incoming as well as outgoing packets.
Pre-requisites for todays experiment
Before diving into todays experiment let see what do we need.
- VMware player, you can obtain VMware player from here.
- Ubuntu Desktop 16.04.1, if you have older versions you can use that as well. (I’ve tested it on 16.04.1)
- Two Virtual Network interface cards on your Ubuntu Virtual Machine
Install virtual machine
You need to create a virtual machine in VMware player and use ubuntu as an operating system, but their are few things you need to take care of before finishing your VM Setup. If you don’t know how to setup a virtual machine you can read an article here.
sudo /usr/lib/vmware/bin/vmware-netcfg
Run this command on your host node, it will open VMware virtual network editor, something like this :
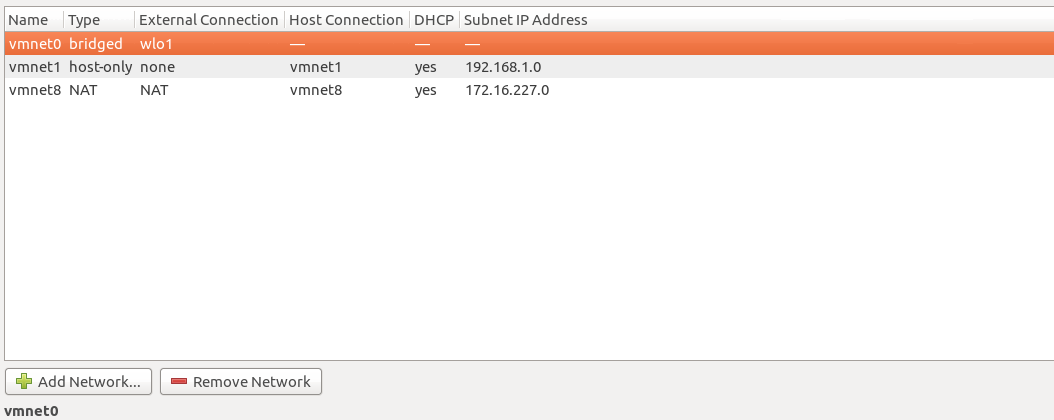
Here you see three headings below ‘Type’:
- birdged (In front of bridge ‘external connection’ is ‘wlo’ which is my wireless card)
- host-only
- NAT
Now you have to make sure that your ‘external connection’ in front of bridge must be your network card that is connected to your router. It can be wireless or lan card as you can see below:

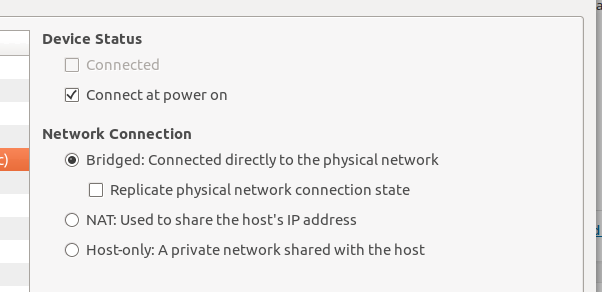
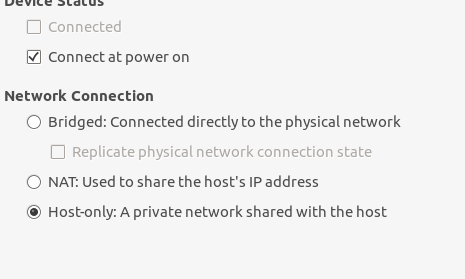
After that press ‘Save’ this window will close . You are now good to create your virtual machine, make sure your virtual machine have two interface cards with following modes
- Bridge mode (You will use it for public services like ssh)
- Host-only mode (This interface will run snort)
You can see the settings for both interface below:
Bridged mode
Host-only mode
Now you can start your machine, and after its online we need IP addresses for both the interfaces.
ifconfig
It will print out the IPs you have on both of your interface, please note interface that is bridged will have an IP similar to your host computer i.e
Your host computer: 192.168.1.2
Your bridged interface: 192.168.1.3
That is how you know which of your interface is bridged and which one is host-only interface.
Step 1
Note: I assume that you already have snort installed and configured before proceeding, if not you can click here.
Use the IP of your birdged interface and login to SSH, and run:
sudo snort -dev -c /etc/snort/snort.conf -i ens34
- -dev : This argument will provide you with all details of packet including
- Packet header.
- Packet payload.
- -c – This argument tell snort where to read the configuration file.
- -i – this argument tell snort which interface to listen on (In our case its host-only interface)
My host-only interface name is ‘ens34’, yours might be different. After this command is executed successfully, you will get output similar to:
(...........)
Preprocessor Object: SF_DCERPC2  Version 1.0  <Build 3>
           Preprocessor Object: SF_SSH  Version 1.1  <Build 3>
           Preprocessor Object: SF_IMAP  Version 1.0  <Build 1>
           Preprocessor Object: SF_MODBUS  Version 1.1  <Build 1>
           Preprocessor Object: SF_REPUTATION  Version 1.1  <Build 1>
           Preprocessor Object: SF_SSLPP  Version 1.1  <Build 4>
Commencing packet processing (pid=4938)
That means snort started to listen for packets on interface ‘ens34’. ( I assume here that host-only interface has IP 192.168.1.128 )
Step 2: Capture Traffic
Open a terminal on your host computer (where VMware is installed).
ping 192.168.1.128 -c 1
-c 1 : Means only 1 ping packet, now you will see something like this on your terminal where snort is running:
07/23-00:42:50.741446 00:50:56:C0:00:01 -> 00:0C:29:3B:00:2D type:0x800 len:0x62
192.168.1.1 -> 192.168.1.128 ICMP TTL:64 TOS:0x0 ID:40393 IpLen:20 DgmLen:84 DF
Type:8  Code:0  ID:16087   Seq:1  ECHO
FA 1F 93 57 00 00 00 00 25 B2 0B 00 00 00 00 00  ...W....%.......
10 11 12 13 14 15 16 17 18 19 1A 1B 1C 1D 1E 1F  ................
20 21 22 23 24 25 26 27 28 29 2A 2B 2C 2D 2E 2F   !"#$%&'()*+,-./
30 31 32 33 34 35 36 37                          01234567

=+=+=+=+=+=+=+=+=+=+=+=+=+=+=+=+=+=+=+=+=+=+=+=+=+=+=+=+=+=+=+=+=+=+=+=+=+

07/23-00:42:50.741467 00:0C:29:3B:00:2D -> 00:50:56:C0:00:01 type:0x800 len:0x62
192.168.1.128 -> 192.168.1.1 ICMP TTL:64 TOS:0x0 ID:54002 IpLen:20 DgmLen:84
Type:0  Code:0  ID:16087  Seq:1  ECHO REPLY
FA 1F 93 57 00 00 00 00 25 B2 0B 00 00 00 00 00  ...W....%.......
10 11 12 13 14 15 16 17 18 19 1A 1B 1C 1D 1E 1F  ................
20 21 22 23 24 25 26 27 28 29 2A 2B 2C 2D 2E 2F   !"#$%&'()*+,-./
30 31 32 33 34 35 36 37                          01234567

=+=+=+=+=+=+=+=+=+=+=+=+=+=+=+=+=+=+=+=+=+=+=+=+=+=+=+=+=+=+=+=+=+=+=+=+=+
Two packets are passed through interface, one is ECHO packet from machine where you initiated ping, and other is ECHO REPLY message from snort machine. You have successfully captured your first two packets on interface ‘ens34’.
Step 3: Perform nmap port scan on your snort machine
nmap is an easy tool to scan any machine for open ports, we will perform nmap scan on our snort machine and see how snort have captured the nmap packets.
nmap -sT 192.168.1.128 -p 22
This will be the output of nmap scan
Starting Nmap 7.01 ( https://nmap.org ) at 2016-07-23 13:00 PKT
Nmap scan report for 192.168.1.128
Host is up (0.00031s latency).
PORT   STATE SERVICE
22/tcp open  ssh

Nmap done: 1 IP address (1 host up) scanned in 0.18 seconds
Captured packets on snort
07/23-01:00:14.496556 00:50:56:C0:00:01 -> 00:0C:29:3B:00:2D type:0x800 len:0x4A
192.168.1.1:49004 -> 192.168.1.128:80 TCP TTL:64 TOS:0x0 ID:48358 IpLen:20 DgmLen:60 DF
******S* Seq: 0xF0AF19F0  Ack: 0x0  Win: 0x7210  TcpLen: 40
TCP Options (5) => MSS: 1460 SackOK TS: 1877270 0 NOP WS: 7

=+=+=+=+=+=+=+=+=+=+=+=+=+=+=+=+=+=+=+=+=+=+=+=+=+=+=+=+=+=+=+=+=+=+=+=+=+

07/23-01:00:14.496645 00:0C:29:3B:00:2D -> 00:50:56:C0:00:01 type:0x800 len:0x4A
192.168.1.128:80 -> 192.168.1.1:49004 TCP TTL:64 TOS:0x0 ID:0 IpLen:20 DgmLen:60 DF
***A**S* Seq: 0xD4E17417  Ack: 0xF0AF19F1  Win: 0x7120  TcpLen: 40
TCP Options (5) => MSS: 1460 SackOK TS: 1473458 1877270 NOP WS: 7

=+=+=+=+=+=+=+=+=+=+=+=+=+=+=+=+=+=+=+=+=+=+=+=+=+=+=+=+=+=+=+=+=+=+=+=+=+

07/23-01:00:14.496694 00:50:56:C0:00:01 -> 00:0C:29:3B:00:2D type:0x800 len:0x4A
192.168.1.1:54574 -> 192.168.1.128:443 TCP TTL:64 TOS:0x0 ID:52476 IpLen:20 DgmLen:60 DF
******S* Seq: 0xFE5069EA  Ack: 0x0  Win: 0x7210  TcpLen: 40
TCP Options (5) => MSS: 1460 SackOK TS: 1877270 0 NOP WS: 7


=+=+=+=+=+=+=+=+=+=+=+=+=+=+=+=+=+=+=+=+=+=+=+=+=+=+=+=+=+=+=+=+=+=+=+=+=+

07/23-01:00:14.645856 00:50:56:C0:00:01 -> 00:0C:29:3B:00:2D type:0x800 len:0x42
192.168.1.1:36246 -> 192.168.1.128:22 TCP TTL:64 TOS:0x0 ID:58070 IpLen:20 DgmLen:52 DF
***A*R** Seq: 0xCD9147F0  Ack: 0xA451130E  Win: 0xE5  TcpLen: 32
TCP Options (3) => NOP NOP TS: 1877307 1473495

=+=+=+=+=+=+=+=+=+=+=+=+=+=+=+=+=+=+=+=+=+=+=+=+=+=+=+=+=+=+=+=+=+=+=+=+=+
I’ve excluded some packets, to make it readable.
Why packet sniffing is beneficial?
You might be thinking why we trying to sniff packets when their is no actual use of it, many people think that packet sniffing is not very important part of snort, but I guess you can use packet sniffing to monitor your network.
If some one have performed nmap scan on your machine then you can easily track the packets, to make sure your open ports are not visible, and or block the IP trying to scan for open ports.